
Understanding the Chocolate Lovers’ Dream Cake
What Is a Chocolate Lovers’ Dream Cake?
Defining the Ultimate Chocolate Experience
Imagine biting into a cake that’s soft, gooey, and packed with bold chocolate flavor. That’s exactly what the Chocolate Lovers’ Dream Cake is all about. It’s not just a cake it’s a complete chocolate fantasy.
Every layer melts in your mouth with smooth chocolate ganache, rich fudge, or velvety mousse. It’s sweet, but not too sweet. It’s also got that hint of bitterness from dark chocolate, giving it the perfect flavor combo that fans can’t stop raving about.
No wonder it’s the go-to choice for birthdays, anniversaries, or any day that could use a little chocolate cheer!
Origins and Popularity
So, where did this dream dessert come from?
The Chocolate Dream Cake has roots in both home kitchens and gourmet bakeries. Over time, chocolate cake recipes evolved, adding ganache, layers, and deeper cocoa flavors. Eventually, the dream version was born rich, dramatic, and unforgettable.
Today, it’s a global sensation. You’ll find it in bakeries around the world, especially during festive seasons and chocolate-themed parties. It’s a classic choice for Valentine’s Day and holiday tables, thanks to its comforting sweetness and picture-perfect look.
Key Characteristics of the Dream Cake
Texture and Flavor Profile
This cake isn’t your usual boxed mix it’s a whole experience.
The Chocolate Lovers’ Dream Cake is known for being moist and fudgy, yet light enough to enjoy a second slice (or third we’re not judging). Every bite offers a burst of rich chocolate, layered with smooth ganache or creamy frosting.
It strikes a beautiful balance: not too sugary, with just enough bitterness to please adult palates while still being kid-approved.
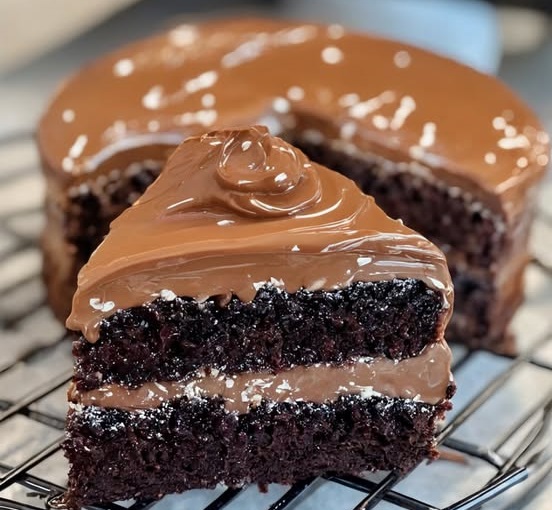
Visual Appeal
This cake isn’t just tasty it’s gorgeous.
Typically, it’s presented as a multi-layered beauty, dripping in glossy ganache, dusted with cocoa powder, or decorated with chocolate curls and shavings. Some bakers even go wild with truffles or chocolate-dipped strawberries on top.
Place it on a dessert table, and it’ll steal the show. It’s the kind of cake that makes guests reach for their phones before their forks.
Ingredients and Preparation
Essential Ingredients for the Perfect Cake
Core Components
To make the perfect Chocolate Lovers’ Dream Cake, you need the right stuff. And when it comes to chocolate, don’t settle for less.
Start with high-quality chocolate. Most dream cakes use a mix of dark chocolate, semi-sweet chocolate, and unsweetened cocoa powder. This combo delivers layers of rich, bold flavors that aren’t overly sweet.
Next up, sour cream. It might sound odd in a cake, but it adds amazing moisture and a gentle tang that balances the richness. Also, chocolate pudding mix gives the cake its deep color and luscious texture. It’s like a secret weapon for bakers.
Let’s not forget the basics: eggs, flour, butter, baking powder, and a pinch of salt. They all work together to give the cake structure, fluff, and flavor.
Optional Enhancements
Want to take your cake from “yum” to “WOW”? Try adding fun extras.
You can mix in chocolate chips, toffee bits, or even swirl in a caramel drizzle for that extra gooey bite. These add-ins create delightful surprises in every slice.
And if you want to boost the flavor even more, add a splash of almond extract or a bit of espresso powder. The espresso doesn’t make the cake taste like coffee it just brings out the deep chocolatey richness. Fancy, right?
Some bakers also top it with homemade whipped cream or dust it with cocoa for that final touch of flair. You can see similar dessert presentation tips in this delicious recipe idea for creamy crab and spinach dip, where texture and presentation go hand-in-hand.
Step-by-Step Baking Guide
Preparation Tips
Before you dive into mixing, make sure your tools and ingredients are ready.
First, grease your cake pans well. You can use butter, cooking spray, or even line the bottom with parchment paper. This simple step saves a lot of headaches later.
Set your oven to 350°F (or as directed in your recipe) and let it preheat completely. A hot oven ensures even baking from the start.
When mixing, start with wet ingredients like eggs, sour cream, and melted chocolate then slowly add the dry ones. Don’t overmix! Stir just until everything’s blended. This keeps the cake soft and fluffy.
Baking Process
Now it’s time to bake your masterpiece.
Pour the batter evenly into your prepared pans and pop them into the oven. Bake for around 30 to 35 minutes, but don’t just trust the clock. Every oven is a little different.
To check if it’s ready, gently insert a toothpick into the center. If it comes out mostly clean (a few moist crumbs are okay), your cake is done.
Be careful not to overbake! That’s the fastest way to lose the dreamy texture.
Cooling and Removal
Once out of the oven, place your cake pans on a cooling rack. Let them sit for about 10 to 15 minutes before you try to remove the cakes.
Gently run a knife around the edges to loosen them. Then flip them onto a wire rack to cool completely.
Never frost a warm cake it’ll melt the frosting and make a mess. Waiting might be hard, but trust me, it’s worth it.
If you love comforting, indulgent dishes like this, you might also enjoy our rich and savory boneless beef ribs in the oven perfect for a hearty main course before this chocolate dream dessert.
Part 3: Frosting, Filling, and Decoration
Crafting the Ideal Frosting
Chocolate Ganache
Ready to make your cake extra dreamy? Let’s start with the chocolate ganache rich, shiny, and oh-so-smooth.
All you need are two main ingredients: chocolate and heavy cream. That’s it! Warm the cream until it starts to bubble gently, then pour it over chopped chocolate. Wait a minute or two, then stir until it turns into a silky sauce.
Want it thicker? Let it cool a bit or pop it in the fridge. Want it pourable? Use it warm. The trick is to find that perfect balance not too runny, not too stiff. This frosting practically melts on your tongue!
Alternative Frosting Options
Not into ganache? No worries! There are other tasty options.
You can whip up a fluffy chocolate buttercream or go for a tangy cream cheese frosting if you like a little zing. Some folks even love sweet whipped cream as a lighter topping.
To jazz things up, add flavors like mint, orange zest, or a drop of hazelnut extract. And if you want to make it pop visually, add a dash of food coloring or edible glitter. Talk about a showstopper! Need more frosting inspiration? Check out these tips for making homemade frosting and gravy for mastering texture and flavor balance.
Filling Ideas to Elevate the Cake
Mousse and Cream Layers
Let’s level up with fillings. They turn a great cake into a legendary dessert.
One popular pick is chocolate mousse. It’s light, airy, and melts in your mouth. You can also try cream cheese mousse for a smooth and slightly tangy surprise between layers.
When stacking your cake, make sure the filling layer is even. That way, your cake stays steady and looks neat when sliced.
Fruit and Nut Additions
Looking to add a bit of zing or crunch? Toss in some raspberries, cherries, or crushed nuts. These not only taste amazing but also give your cake beautiful color and texture.
Just remember, it’s all about balance. Too much fruit can make the cake soggy, and too many nuts can overpower the chocolate. Mix and match until you find your dream combo!
If you’re into layers of flavor, you’ll love this Golden Garlic Chicken Pasta savory comfort food stacked with textures and depth.
Decorating Like a Pro
Garnishing Techniques
Time to dress up your cake! Even the simplest cake can turn heads with a little garnish.
Sprinkle chocolate shavings across the top. Add rainbow sprinkles for a fun vibe. Feeling fancy? Try edible gold leaf for that luxury touch.
Piping is fun too! Use a piping bag to add swirls, stars, or hearts. It’s like doodling with frosting!
Presentation Tips
The way you present your cake can make it shine even more.
Choose a pretty cake stand something sturdy but stylish. White platters make dark chocolate colors pop.
You can also serve it with a scoop of vanilla ice cream, fresh berries, or even a dollop of whipped cream on the side. Simple, elegant, and totally drool-worthy.
Part 4: Variations and Dietary Adaptations
Popular Variations of the Dream Cake
Flourless Chocolate Cake
Want that rich chocolate punch without the gluten? Then the flourless chocolate cake might be your new best friend.
Instead of flour, this version uses eggs, cocoa powder, and melted chocolate to create a dense, fudgy texture. It’s kinda like a cross between a brownie and a truffle smooth, rich, and seriously indulgent.
Just keep in mind, the baking time’s a little different. Since it’s denser, you’ll bake it at a lower temperature and check for doneness using the toothpick method. A few moist crumbs? Perfect.
This one’s a go-to for folks with gluten sensitivities, and it’s naturally gluten-free. So, it’s a win for flavor and dietary needs!
Layered and Bundt Versions
If you’re into cakes that wow a crowd, you’ll love the layered and Bundt cake takes on this dessert.
A layered chocolate dream cake looks super fancy but is really easy to pull off. You can stack two or even three layers with mousse or frosting in between, making every bite a surprise.
On the flip side, a Bundt cake gives you those gorgeous ridges and a slightly crispier edge. It’s perfect if you want a cake that holds shape and slices cleanly.
Each version has its own charm layered cakes feel like special-occasion showstoppers, while Bundts are ideal for casual gatherings. Either way, you’re getting a chocolate masterpiece.
Making It Healthier
Ingredient Substitutions
Trying to cut back on calories but still want your cake fix? No problem just swap a few ingredients!
Instead of butter, try using Greek yogurt or unsweetened applesauce. They keep the cake moist and add a little boost of nutrition, too.
You can also lower the sugar just a bit or use natural sweeteners like honey or coconut sugar. The goal is to maintain that rich chocolate flavor without overloading on sweetness. For other health-friendly swaps, these comfort food side dish tips can guide you in the right direction.
Vegan and Gluten-Free Options
Need a cake that’s both vegan and gluten-free? You’ve got options!
Swap out eggs with flaxseed meal mixed with water, use plant-based milk, and go with coconut oil or avocado oil instead of butter. For the flour, pick almond flour, oat flour, or a gluten-free blend.
The trick is keeping the cake moist and fluffy so don’t forget a binding agent like applesauce or mashed banana. It might take a little experimenting, but when done right, these cakes taste just as dreamy as the classic version.
By the way, if you haven’t yet, take a peek at our rich and easy-to-make Creamy Shrimp and Crab Spinach Dip. It’s another decadent dish worth bookmarking!
Part 5: Serving and Storage
Serving Suggestions
Ideal Pairings
Now that your Chocolate Lovers’ Dream Cake is ready, let’s talk about serving it up like a pro!
This cake pairs like a dream with a cold glass of milk, a steaming mug of coffee, or even hot cocoa for those extra cozy vibes. These drinks help balance the richness of the cake and make each bite feel lighter.
As for sides? A scoop of vanilla ice cream or a few fresh berries can add a nice contrast. Even something as simple as a dollop of whipped cream works wonders.
And if you’re setting up a dessert spread, consider adding something like our Golden Garlic Chicken Bites over Creamy Parmesan Pasta for a savory main to go with your sweet finale!
Portioning and Presentation
Want to make a clean cut? Use a sharp knife dipped in hot water and wiped clean between each slice yep, that’s the secret trick!
Place slices on a simple white plate or cake stand to really let the cake shine. Add a drizzle of chocolate syrup or a sprinkle of powdered sugar for that final wow factor. Presentation matters, and just a little effort makes a big difference.
Storing for Freshness
Short-Term Storage
If you’re planning to enjoy the cake within a day or two, you can keep it at room temperature just make sure it’s covered tightly with plastic wrap or stored in an airtight container to lock in that moisture.
For longer freshness, refrigerate it, especially if it has cream-based fillings or toppings. But before serving, let it sit out a bit to soften up. Nobody likes cold, hard cake!
Freezing for Longevity
Need to save a few slices for later? No problem. First, wrap each slice in plastic wrap, then cover it with foil, and finally place it in a freezer-safe container or bag. That triple protection helps prevent freezer burn and keeps flavors locked in.
When you’re ready to eat, just thaw the slice at room temperature for a couple of hours. The texture and taste will still be absolutely dreamy!
Part 6: Frequently Asked Questions
Can I use milk chocolate instead of dark chocolate?
Sure, you can! But there’s a little trade-off. Milk chocolate is sweeter and much creamier than dark chocolate, so your cake will turn out less intense and more sugary.
If you’re after a deep, rich chocolate flavor, dark or semi-sweet chocolate is the way to go. Still, if you’re baking for kids or anyone with a big sweet tooth, milk chocolate could be a fun twist!
How do I prevent my cake from sticking to the pan?
Great question because nothing’s worse than baking the perfect cake and having it fall apart on release. The best method? First, grease the pan with butter or cooking spray. Then, dust it with flour, tapping out the excess.
Even better? Use parchment paper at the bottom of the pan. That combo gives your cake the best shot at a clean, easy release. No more broken dreams just perfect slices!
What’s the best way to achieve a moist texture?
Ah, the secret to that mouthwatering, moist crumb! It all comes down to the right ingredients and gentle mixing. Adding sour cream, pudding mix, or even a touch of oil helps keep your cake soft and tender.
But don’t overmix doing so can make the cake dense and tough. Mix just until everything’s combined, and you’ll be golden.
Can I make this cake ahead of time?
Absolutely! In fact, Chocolate Lovers’ Dream Cake often tastes better the next day. Just wrap it tightly in plastic wrap or store it in an airtight container. It’ll stay fresh in the fridge for up to four days.
Want to freeze it? No problem wrap and freeze for up to three months. Thaw overnight in the fridge, and it’ll taste just as dreamy.
How can I add a coffee flavor to the cake?
If you’re craving that mocha vibe, go ahead and add espresso powder or brewed coffee into the batter. It won’t overpower the chocolate it’ll actually enhance the richness.
Want to go bolder? Mix espresso into the ganache or frosting. Just a spoonful of strong coffee can add a grown-up twist without making the cake taste like coffee.